
イントロダクション
ゲーム画面の文字を認識して翻訳するソフトはすでに存在している。ぬるっぽ氏が制作している「PCOT」である。
大抵のゲームはこちらのソフトを使用することでストレスフリーに翻訳できるだろう。
ただし、あまりにも字体が独特なゲームだと、スペルミスが目立つようになってしまう。(普通のフォントにしてくれれば、面倒なスペルチェックをしなくて済むというのに・・・)
例として、「THE GOLDEN IDOL」というゲームで以下の文章をPCOTに読み込んでもらう。

出力結果
For sharing this secret, I Will allow gyour Zubiri to [ive, but he must jfoin me on the fourney as has insurance feor your henesty, You are free ts Leayse “alra” your delegation,
For sharing this secret, I Will allow gyour Zubiri to [ive, but he must jfoin me on the fourney as has insurance feor your henesty, You are free ts Leayse “alra” your delegation,
やはりスペルミスが出てしまう
※過去にPCOTにもGoogle翻訳のスペルチェック機能があったようだが、廃止されたそうだ
個人的には「大まかにスペルチェックをしてくれる機能が欲しいな」と感じたので、pythonで簡単な翻訳支援ツールを作成した。
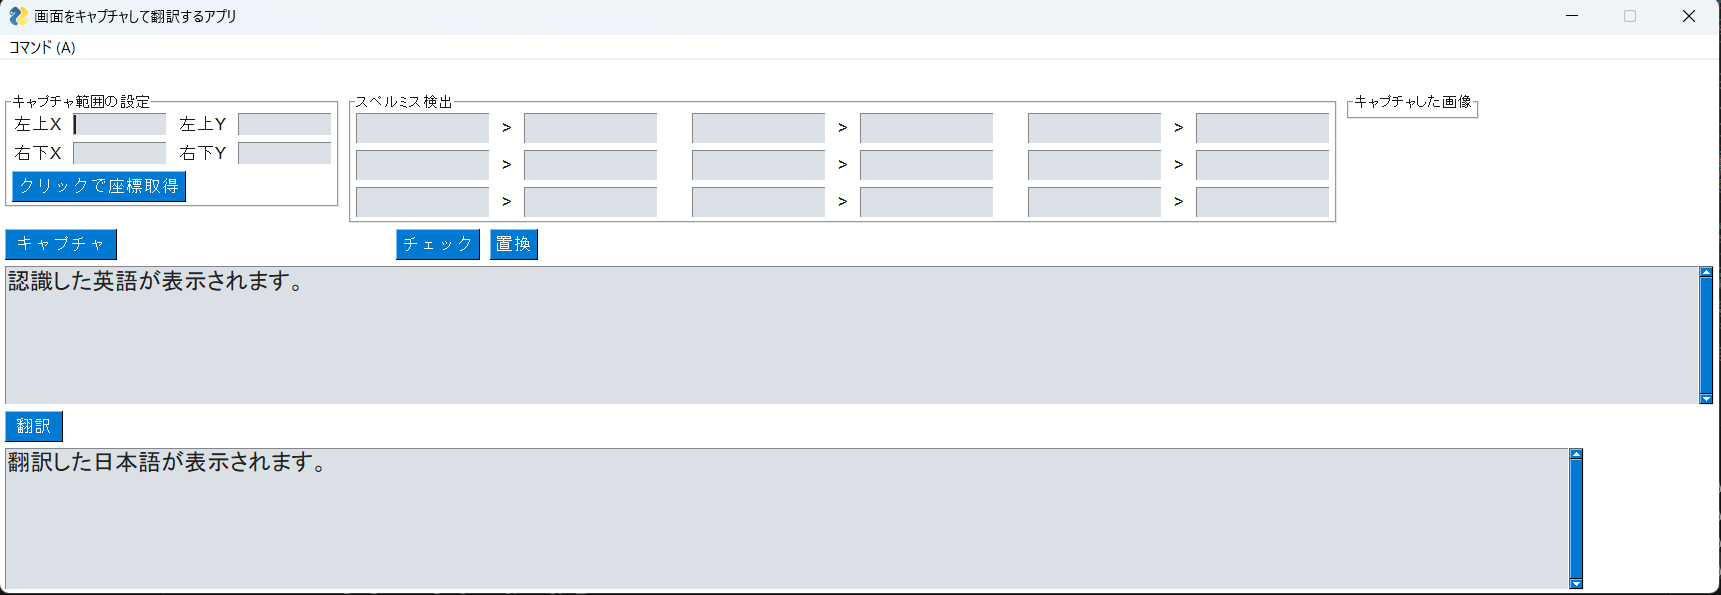
完成品
完成したツールがこちらである。
全体のコードは一番下に掲載する。
なお、DeepLを利用するためには、公式ホームページからAPIキーを取得する必要がある。(取得方法については、説明を省略する)
主要モジュールについて
| pyocr | テキストの光学文字認識(OCR)を行うPythonモジュール。Tesseract OCRなどのOCRエンジンと連携して、画像やスキャンされた文書のテキストを取得できる。 |
| pyautogui | グラフィカルユーザーインターフェース(GUI)操作を自動化するPythonライブラリ。座標の取得、スクリーンショットの取得やウィンドウの制御も可能で、自動化タスクやUIテストに役立つ。 |
| PySimpleGUI | テキストボックス、ボタン、ウィンドウのレイアウトなどのGUI要素を簡単に操作できる。 |
| autocorrect | 文章やテキストのスペルチェックを行うためのPythonモジュール。文法や文脈に基づいたスペルチェックも行うことができ、文章の品質向上に役立つ。 |
| requests | HTTPリクエストを簡単に送信するためのPythonライブラリ。ウェブサーバーとの通信やAPIリクエストを行うのに便利。 |
コード解説
pipインストール
pip3 install pyautogui #pyautoguiのインストール
pip3 install opencv-python #OpenCVのインストール
pip3 install pyocr #pyOCRのインストール
pip3 install PySimpleGUI #PySimpleGUIのインストール
pip3 install autocorrect #autocorrectのインストール
ソースコード
import os
from tkinter.constants import TOP
import PySimpleGUI as sg
import pyocr
import pyocr.builders
import pyautogui
import cv2
from PIL import Image
from pynput import mouse #module pynputをインポート
import requests
import json
from autocorrect import Speller
# テーマ
sg.theme('Reddit')
# APIのエンドポイントと認証情報を設定
endpoint = "https://api-free.deepl.com/v2/translate" #無料版と有料版でURLが異なるので注意
auth_key="ここにdeepLのAPIキーを入力"
# OCRソフトのパスを指定
TESSERACT_PATH = 'C:\Program Files\Tesseract-OCR'
TESSDATA_PATH = 'C:\Program Files\Tesseract-OCR\\tessdata'
os.environ["PATH"] += os.pathsep + TESSERACT_PATH
os.environ["TESSDATA_PREFIX"] = TESSDATA_PATH
#pyocr.tesseract.TESSERACT_CMD = 'C:\\Program Files\\Tesseract-OCR\\tesseract.exe'
tools = pyocr.get_available_tools()
if len(tools) == 0:
    print("No OCR tool found")
    sys.exit(1)
# The tools are returned in the recommended order of usage
tool = tools[0]
print("Will use tool '%s'" % (tool.get_name()))
# Ex: Will use tool 'libtesseract'
langs = tool.get_available_languages()
print("32:","Available languages: %s" % ", ".join(langs))
lang = langs[0]
print("Will use lang '%s'" % (lang))
# Ex: Will use lang 'fra'
# Note that languages are NOT sorted in any way. Please refer
# to the system locale settings for the default language
# to use.
# ↑PyOCR使う時の呪文、おまじない。
menu_def = [
    ['コマンド (&A)', ['左上隅の座標 (&A)::left_cood::',
                   '右下隅の座標 (&S)::right_cood::',
                   '画面キャプチャ (&D)::capture::',
                   'スペルチェック (&Z)::spellchk::',
                   'カンマ→ピリオド (&X)::period_rpl::',
                   '置換 (&C)::rpl::',
                   '翻訳 (&V)::trans::']]
]
layout=[
    [sg.Menu(menu_def)],
    [sg.Text(key="txt")],  # header
    [sg.Column([
        [
            sg.Frame('キャプチャ範囲の設定',
            [
                [sg.Text("左上X"),sg.I("", k="x1",size=(10,50)),sg.Text("左上Y"),sg.I("", k="y1",size=(10,50))],
                [sg.Text("右下X"),sg.I("", k="x2",size=(10,50)),sg.Text("右下Y"),sg.I("", k="y2",size=(10,50))],
                [sg.Button("クリックで座標取得", k="clk_cood_btn",tooltip='ボタンクリック後、キャプチャしたい\n範囲の左上隅、右下隅の2カ所を\nクリックしてください'),
                 ],
            ], vertical_alignment=TOP, font=('BIZ-UDGOTHICB.TTC', 9),
            ),
            sg.Frame('スペルミス検出',
            [
                [sg.I("", k="miss0",size=(10,60), font=("Consolas",14)),sg.Text(">"),sg.I("", k="correct0",size=(10,60), font=("Consolas",14)),sg.Text("  "),
                 sg.I("", k="miss1",size=(10,60), font=("Consolas",14)),sg.Text(">"),sg.I("", k="correct1",size=(10,60), font=("Consolas",14)),sg.Text("  "),
                 sg.I("", k="miss2",size=(10,60), font=("Consolas",14)),sg.Text(">"),sg.I("", k="correct2",size=(10,60), font=("Consolas",14))],
                [sg.I("", k="miss3",size=(10,60), font=("Consolas",14)),sg.Text(">"),sg.I("", k="correct3",size=(10,60), font=("Consolas",14)),sg.Text("  "),
                 sg.I("", k="miss4",size=(10,60), font=("Consolas",14)),sg.Text(">"),sg.I("", k="correct4",size=(10,60), font=("Consolas",14)),sg.Text("  "),
                 sg.I("", k="miss5",size=(10,60), font=("Consolas",14)),sg.Text(">"),sg.I("", k="correct5",size=(10,60), font=("Consolas",14))],
                [sg.I("", k="miss6",size=(10,60), font=("Consolas",14)),sg.Text(">"),sg.I("", k="correct6",size=(10,60), font=("Consolas",14)),sg.Text("  "),
                 sg.I("", k="miss7",size=(10,60), font=("Consolas",14)),sg.Text(">"),sg.I("", k="correct7",size=(10,60), font=("Consolas",14)),sg.Text("  "),
                 sg.I("", k="miss8",size=(10,60), font=("Consolas",14)),sg.Text(">"),sg.I("", k="correct8",size=(10,60), font=("Consolas",14))]
            ], vertical_alignment=TOP, font=('BIZ-UDGOTHICB.TTC', 9),
            ),
            sg.Frame('キャプチャした画像',
            [
                [sg.Im(k="img")]
            ], vertical_alignment=TOP, font=('BIZ-UDGOTHICB.TTC', 9),
            ),
        ]
        ], element_justification = "center", pad=((0,0),(0,0))#カラム情報
        )
    ],
    [sg.B(" キャプチャ ", k="capture_btn"),sg.Text("                                                   "),
     sg.Button("チェック", k="spellchk_btn"),sg.Button("置換", k="spellrpl_btn")],
    [sg.ML("認識した英語が表示されます。",k="cap_txt", font=("Consolas",14), size=(130,5))],
    [sg.B(" 翻訳 ", k="trans_btn")],
    [sg.ML("翻訳した日本語が表示されます。",k="trans_txt", font=(None,14), size=(130,6))]
]
window = sg.Window(
    '画面をキャプチャして翻訳するアプリ',
    layout,
    #element_justification="center",
    margins=(0,0),
    grab_anywhere=True,
    keep_on_top=True,  #常に前面に表示
)
#マウスクリックを定義
def on_click(x, y, button, pressed):
    if pressed:
        # Stop listener
        return False
def clk_coodinate():
    #左上隅の座標を取得します
    with mouse.Listener(on_click=on_click) as listener:
        listener.join()
    x1, y1 = pyautogui.position()
    #右下隅の座標を取得します
    with mouse.Listener(on_click=on_click) as listener:
        listener.join()
    x2, y2 = pyautogui.position()
    txt = "(" + str(x1) + ", " + str(y1) + ")" + "(" + str(x2) + ", " + str(y2) + ")" + "座標を取得しました"
    window["txt"].update(txt)
    window['x1']. Update(x1)
    window['y1']. Update(y1)
    window['x2']. Update(x2)
    window['y2']. Update(y2)
def upper_left_coodinate():
    #左上隅の座標を取得します
    x1, y1 = pyautogui.position()
    txt = "(" + str(x1) + ", " + str(y1) + ")" + "座標を取得しました"
    window["txt"].update(txt)
    window['x1']. Update(x1)
    window['y1']. Update(y1)
def bottom_right_coodinate():
    #右下隅の座標を取得します
    x2, y2 = pyautogui.position()
    txt = "(" + str(x2) + ", " + str(y2) + ")" + "座標を取得しました"
    window["txt"].update(txt)
    window['x2']. Update(x2)
    window['y2']. Update(y2)
def ScreenShot_capture():
    if (value["x1"].isdecimal() and value["y1"].isdecimal() and value["x2"].isdecimal() and value["y2"].isdecimal()):
        x1 = int(value["x1"])
        y1 = int(value["y1"])
        x2 = int(value["x2"])
        y2 = int(value["y2"])
        # PyAutoGuiのregionの仕様のため、相対座標を求める
        x2 -= x1
        y2 -= y1
        sc = pyautogui.screenshot(region=(x1, y1, x2, y2)) # PosGet関数で取得した座標を使用
        sc.save('screenshot.jpg')
        # 画像拡大、グレースケールを有効
        img = cv2.imread('screenshot.jpg')
        gray = cv2.cvtColor(img, cv2.COLOR_BGR2GRAY)
        tmp = cv2.resize(gray, (gray.shape[1]*2, gray.shape[0]*2), interpolation=cv2.INTER_LINEAR)
        # 出力サイズ(幅、高さ)を指定してリサイズ
        dst = cv2.resize(tmp, (250, 100))
        cv2.imwrite('screenshot.jpg', tmp)
        cv2.imwrite('screenshot.png', dst)
        window["img"].update("screenshot.png")
        cap_txt = tool.image_to_string(
            Image.open('screenshot.jpg'),
            lang="eng",
            builder=pyocr.builders.TextBuilder(tesseract_layout=6)
        ) # 英文を読み取る時はlang="eng"
        cap_txt = cap_txt.replace('\n', ' ')
        window["txt"].update("OCR処理が完了しました")
        window["cap_txt"].update(cap_txt)
    else:
        window["txt"].update("座標が入力されていません")
def translate_ja_to_en():
    if not value["cap_txt"] == "" :
        text = str(value["cap_txt"])
        # APIに送信するリクエストパラメータを設定
        params = {
            "auth_key": auth_key,
            "text": text,
            "source_lang": "EN",
            "target_lang": "JA",
            #"split_sentences": -1,
            #"preserve_formatting": 1,
            #"tag_handling": "xml"
        }
        # APIにリクエストを送信して翻訳結果を取得
        response = requests.post(endpoint, data=params)
        result = json.loads(response.content.decode())
        #print("result:",result)
        # 翻訳結果を取り出して返す
        translated_text = result["translations"][0]["text"]
        window["trans_txt"].update(translated_text)
    else:
        window["txt"].update("テキストが入力されていません")
# スペルミスを検出する関数
def spell_check():
    spell = Speller(lang='en')
    text = str(value["cap_txt"])
    text = text.replace(",","")
    words = text.split()
    bfr_word = []
    aft_word = []
    for word in words:
        if not word == spell(word):
            bfr_word.append(word)
            aft_word.append(spell(word))
    miss_count = len(bfr_word)
    miss_count = len(aft_word)
    bfr_word += [None] * (9 - len(bfr_word)) #リスト9まで空白を埋める
    aft_word += [None] * (9 - len(aft_word)) #リスト9まで空白を埋める
    for i in range(9):
        window["miss" + str(i)].update("")
        window["miss" + str(i)].update(bfr_word[i])
        window["correct" + str(i)].update("")
        window["correct" + str(i)].update(aft_word[i])
    window["txt"].update(f"{miss_count}個のスペルミスをチェックしました")
# スペルミスを置換する関数
def spell_rpl():
    count = 0
    text = str(value["cap_txt"])
    for i in range(9):
        if not value["correct" + str(i)] == "" and not value["miss" + str(i)] == value["correct" + str(i)]:
            bfr_rpl = str(value["miss" + str(i)])
            aft_rpl = str(value["correct" + str(i)])
            print(count,text)
            text = text.replace(bfr_rpl,aft_rpl)
            window["cap_txt"].update(text)
            count += 1
    window["txt"].update(f"{count}種類のワードを置換しました")
def period_rpl():
    text = str(value["cap_txt"])
    text = text.replace(",",".")
    window["cap_txt"].update(text)
    window["txt"].update("カンマをピリオドに置換しました")
while True:
    event, value = window.read()
    if event == "clk_cood_btn":
        clk_coodinate()
    if '::left_cood::' in event:
        upper_left_coodinate()
    if '::right_cood::' in event:
        bottom_right_coodinate()
    if event == "capture_btn" or '::capture::' in event:
        ScreenShot_capture()
    if event == "trans_btn" or '::trans::' in event:
        translate_ja_to_en()
    if event == "spellchk_btn" or '::spellchk::' in event:
        spell_check()
    if event == "spellrpl_btn" or '::rpl::' in event:
        spell_rpl()
    if '::period_rpl::' in event:
        period_rpl()
    if event == None:
        break


window.close()
参考にしたサイト
ゲーム画面の画像認識 → 文字認識 → 文字起こし の流れをリアルタイムに行う - Qiita
1. はじめに PyOCRを利用した文字認識に挑戦中のメモ書きです。 こういった場での公開は初めてなので、至らない点もあるかと思いますがよろしくお願いします。 好きなゲームの布教・翻訳を目的に作り始めたのでこんな記事タイトルをしてますが、記...
qiita.com

404 Not Found
fuji-pocketbook.net
pythonで英語スペルミスの検出を試みた - Qiita
pythonで英語スペルミスの検出を試みた際の備忘録 今回試したライブラリ autocorrect pyspellchecker text blob library pyenchant autocorrect
qiita.com

コメント